How To Use PowerShell Command To Export Mailbox To PST Exchange 2016? Complete Solution

Most of the users are new to the Microsoft Exchange Server environment and they don’t know how to use the PowerShell command to export mailbox to PST Exchange 2016. Here, in this article, we will guide users & provide solutions that help Novice users to use the Exchange PowerShell cmdlet i.e. New-MailboxExportRequest to export the EDB mailbox to Outlook data file.
Exchange mailboxes contain crucial data such as: mails, notes, tasks, calendars, contacts, etc… which is very important for users or the company and to keep this Exchange data safe and secure it is very necessary to export the mailbox to Outlook PST file format for backup and storage purpose.
As we know that the EDB mailbox are stored in the Exchange database file which is the main repository of the Microsoft Exchange Server and it is prone to corruption. If any mailbox database gets corrupted or damaged then it becomes inaccessible. Then users won’t be able to access the Exchange mailboxes and its data items. Also, it would disrupt the workflow and you may lose data. In that case, the PST file work as a backup file for users from which they can retrieve and access the Exchange data back by importing it into the server or MS Outlook.
Use New-MailboxExportRequest PowerShell Command to Export Mailbox to PST Exchange 2016
There are numerous PowerShell cmdlet available that have its own role & perform different operations and to export Exchange 2016 mailbox to PST PowerShell users can use the New-MailboxExportRequest command.
This PowerShell command applies to the Exchange 2010, 2013, 2016, and above version Server. It export the content of the primary and archive Exchange database mailbox to the Outlook data file but before using the command users have to provide Mailbox Import Export Role. The reason behind is this that the PowerShell cmdlet provided here is available in this role and by default, it does not assign to any role group.
Execute the command given below to assign the role:
New-ManagementRoleAssignment –Role “Mailbox Import Export” –User “enter the user name”
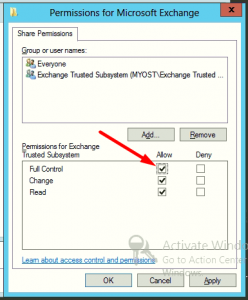
After assigning the role, you have to create the shared folder and provide read / write or full control permission to the Exchange Trusted Subsystem security group of that specific folder.
Use the following steps to grant the permission:
- Generate New Folder > Right-click on it and select the properties option
- Select the sharing tab > Click on the advanced sharing option
- Then, click on the share this folder option > Select the permission button
- Select the Add button & insert the Exchange Trusted Subsystem in the dialogue box
- After that, select the given checkbox i.e. full control > Click on the apply button

Export Mailbox to PST Using PowerShell Exchange 2016
Execute the command given below to export the mailbox.
Syntax:
New-MailboxExportRequest -Mailbox “Enter the name of Exchange database mailbox” -FilePath “Insert the UNC file path”
Example:
New-MailboxExportRequest -Mailbox “Monika” -FilePath “\\Desktop\Folder\filename.pst”
The PowerShell cmdlet provided above export the mailbox name Monika to the provided destination file path.
If users want to export the archive EDB mailbox then for that users have to insert different command.
Follow the Exchange PowerShell cmdlet given to export archive mailbox to Outlook data file.
Syntax:
New-MailboxExportRequest -Mailbox “Enter the name of Exchange database mailbox” -FilePath “Insert the UNC file path” -IsArchive
Example:
New-MailboxExportRequest -Mailbox “John” -FilePath “\\Desktop\Folder\filename.pst”
From this command, users can export the Exchange database archive mailbox name John to the PST file in the provided target file location.
To bulk export mailbox to PST Exchange 2016 PowerShell, use the cmdlet given below:
1. $Export = Get-Mailbox
2. $Export|%{$_|New-MailboxExportRequest -FilePath “\\Computer\Exchange mailbox\$($_.file).pst”}
With this command, users can export the multiple mailboxes to the Outlook data file. Like this for every different operation users have to use the various cmdlet.
Limitation Of Manual Solution
- The method does not export offline / dismounted Exchange database mailboxes. It only export the on-premise the Exchange Server mailbox
- It cannot work properly with the corrupted or damaged mailboxes
- Users should have requires users to have technical knowledge, skills, and hands-on experience
- It is time consuming and prolonged method. Depending on the size of the mailbox it takes time to export it
Note: There are most users who are are having dismounted or offline Exchange database file and they want to export mailboxes from this database but the manual solution provided here only export on-premise Exchange mailbox. In that case, you can use the advance solution which supports these Exchange database files and easily export bulk mailboxes to the Outlook data file.
Use Automated Wizard to Export Offline Exchange EDB Mailbox to Outlook PST File
You can use the EDB to PST Converter Tool provided by SysTools which is designed and developed with an advanced algorithm & used by many IT professionals, Exchange and novice users to export multiple mailboxes (user, archive, disconnected, shared, archive) of any size from dismounted / offline Exchange database file to the PST file format without using any command in a simplified manner. By default, it creates UNICODE PST file.
This advanced utility offers scan mode option i.e. Quick and Advance scanning mode which recovers Exchange database file from minimal and major corruption in a hassle freeway. Depending on the level of corrupted EDB file users can select the dual scan to recover Exchange database from corruption. To recover minimal corruption select the Quick scan and for highly corrupted .edb file click the advance can to recover and repair it.
After recovery, users can export the recovered as well as healthy mailboxes to the PST and other file formats in a simplified way. The software easily bulk or selective export various mailboxes such as: user, archive, disconnected, legacy, shared and data items like – mails, notes, tasks, calendars, contacts, notes to the selected file format simultaneously. It generates the export report which contains the success and fail counts of exported Exchange mailbox data in CSV file format.
Notable Features Of Automated Tool
- Support dismount/offline EDB file (Public & Private)
- Preview Exchange mailbox items before conversion
- Preserve actual folder hierarchy and keep metadata intact
- Categories filter option export selective mailbox data items
- Remove (SMIME/OpenPGP) email encryption from EDB mailboxes in bulk
- Export Exchange mailbox data within specified date range via date filter option
- Support all version of Exchange Server, MS Outlook, & Windows OS version
Working Steps to Export Offline EDB Mailboxes to Outlook PST File
1. Download, Install and Run the advance utility in your local system
2. Then, click on the add file button to load Offline Exchange database file >> Select the add button
Note: If you want to recover and repair corrupt Offline / dismounted Exchange database file then select the scan mode option i.e. Quick and Advance scan.
3. Preview the Exchange EDB mailboxes >> Click on the export button
4. Select the mailboxes >> Click on PST export type option >> Select the browse button to set destination file path >> Click on the export button
5. Finally, the offline Exchange database mailboxes is successfully exported to the Outlook data file
Bringing It All Together
Now users have complete information on how to use the PowerShell command to export mailbox to PST Exchange 2016 provided in this article. In addition to this, we have also provided the solution to export offline / dismounted Exchange database mailbox to the Outlook data file by using the advanced method mentioned in this write-up which easily perform this conversion without any hassle. Depending on your preferences you can select the solution and perform the conversion without any hindrance.


